


Contents
Nordic Glory — How to Play
A two-player card game of shield walls, rituals and runes. Break the enemy Jarl to win.
Rules version 1.124 · 19 October 2026
1. The game in one minute
- Each player has a Jarl (40 Defense) and a 3 × 3 grid of shields in front of it.
- Both players act in the same turn, phase by phase. There is no "my turn, your turn".
- Each turn ends in a Battle. Both sides add up their attack, and whoever comes out ahead deals the difference as damage to one enemy front-line shield. Damage that goes beyond that shield hits the enemy Jarl.
- You win when the enemy Jarl reaches 0 Defense, or when your opponent loses their last shield.
2. What you need
Your cards
 Jarl
 Shield
 Ritual
 Element
| You bring | Size | What it is |
|---|---|---|
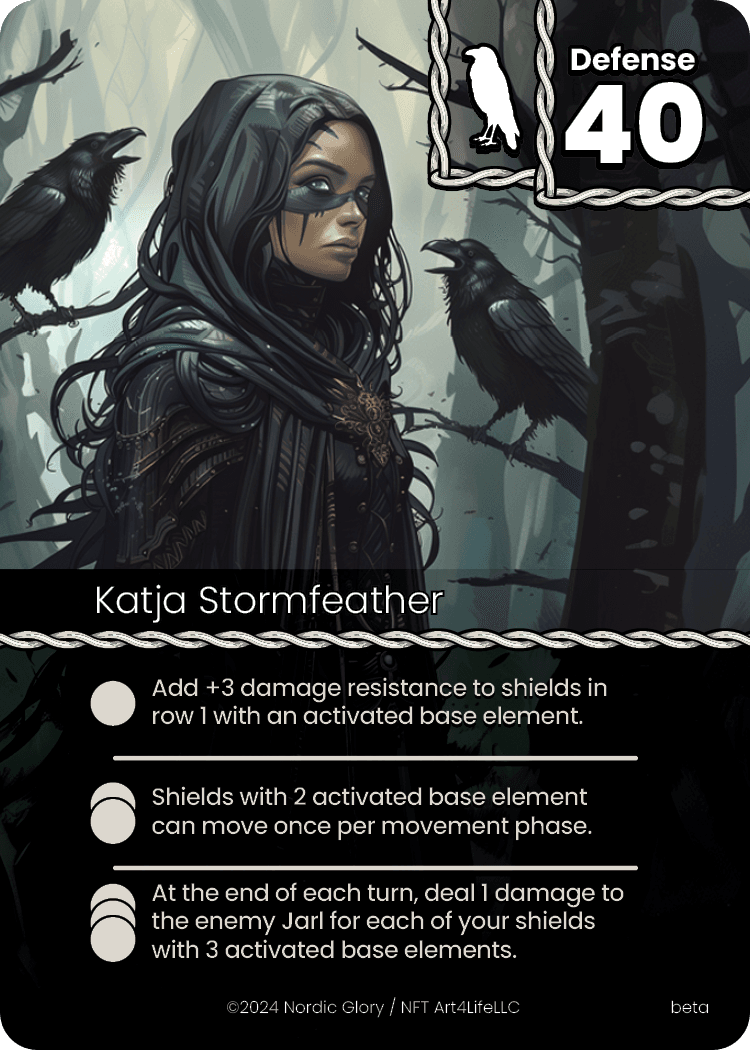
| Jarl | 1 card | Your champion. 40 Defense. Has three abilities that Element cards unlock. |
| Shield Deck | exactly 24 | Your warriors. They stand on your grid and fight. |
| Ritual Deck | exactly 45 | Ritual cards (spells and effects) and Element cards, shuffled together into one pile. |
You also need one d8 (the rune die) and d6s for battle (three per player covers almost every turn; Strength and some cards add more).
Reading a shield
 Attack
 Defense
 Attack Gem
 Defense Gem
 Rune
 Base Element
 Sub-elements
 Symbol
 Enhancement
 Blood
 Death
 Earth
 Flame
 Heart
 Leaf
 Moss
 Night
 Sand
 Sea
 Sky
 Snow
 Spirit
 Stone
 Wheat
 Wood
Every shield shows:
- Attack and Defense: its two printed numbers.
- Base Element: one of sixteen (Blood, Death, Flame, Sea, Wood, …).
- Sub-elements: up to five smaller element icons.
- Attack Gem and Defense Gem: one of each. Both come from the same set of nine gems.
- Rune: every shield has exactly one. It does something only on turns the rune die rolls it.
- Enhancement: Daggers, Sword, Arrows, Raven or Ice (see the quick reference).
- Symbol: matters only to the symbol rituals (Blot Sacrifice, Cursing Pole, It Takes a Village).
Building a deck
Shield Deck (24):
- At most 6 shields with the same Base Element.
- At most 3 shields with the same Enhancement.
Ritual Deck (45):
- One copy of each Ritual, except Symbol rituals, which allow 2 copies per card name.
- Element cards have no copy limit. They still take up deck slots.
These limits apply only to the cards you bring. An Enhancement a card grants during play doesn't count against them. Both players may bring the same Jarl.
The beta decks. The two playtest decks, Thegn and Drang, each run 33 different Rituals plus 12 Element cards (four Elements, three copies each).
3. Setup
- Shuffle your Shield Deck and your Ritual Deck separately. Offer your opponent a cut of each.
- Draw 6 shields and place them face up in the order drawn, left to right: Row 1 first (slots 1–3), then Row 2 (slots 4–6).
- Draw 7 cards from your Ritual Deck and 3 cards from your Shield Deck into your hand.
- Roll a die or flip a coin. The winner is the first player for turn 1.
4. The battlefield
The grid
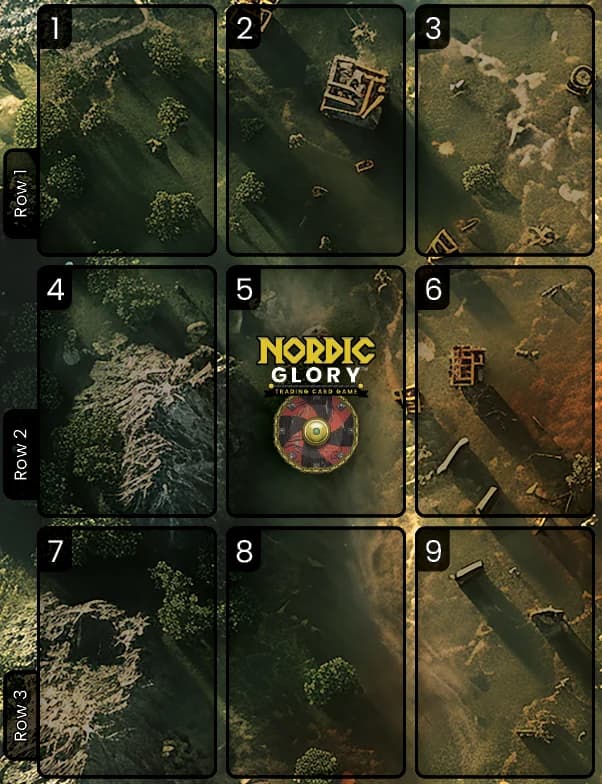
Each player has nine slots: three columns wide and three rows deep. Row 1 is your front line.
You may never have more than 9 shields on your battlefield.
Row 1 does most of the work. Base attack, alignment bonuses and battle dice all come from Row 1, and only Row 1 can normally be targeted by battle damage. Rows 2 and 3 are your reserves, and some Jarl abilities, enhancements and runes reward shields standing there.
The two battlefields face each other
The mats are laid Row 1 to Row 1, with the front lines touching. Because the mats face opposite ways, your column 1 faces the opponent's column 3, column 2 faces column 2, and column 3 faces column 1.
Only Row 1 has a shield directly across from it. The Ice enhancement and the Peace rune use this.
No gaps, ever
B leaves. Everything behind it in that column slides forward.
C leaves and its column is empty. The middle column is the nearest one that can spare a shield, so its backmost shield, D, slides across into Row 1.
The grid keeps itself packed toward the front. It happens automatically, the moment a slot empties, and nobody gets to choose otherwise.
- Nothing stands behind an empty slot. When a shield leaves, every shield behind it in the same column slides forward.
- Row 1 is always full while you have three or more shields. If a whole column empties, the nearest column that can spare a shield gives its backmost shield, which slides across into Row 1 of the empty column. A column can only give if it would still hold at least one shield afterwards. If no column can spare one, the empty column stays empty.
- If the centre column empties and both sides could give, the player whose battlefield it is chooses which one does.
- If one effect removes several shields at once, they all leave together, every column slides forward first, and only then do empty columns borrow sideways. If two empty columns compete for one spare shield, the one nearer the giving column gets it. On a tie, the board's owner chooses.
So while you hold three or more shields, your front line is full and you roll three battle dice.
"Adjacent"
Two slots are adjacent when they share an edge: left, right, in front or behind. Never diagonally. A centre slot has four neighbours, an edge slot three and a corner slot two. Adjacency never crosses to the opponent's battlefield.
5. The turn
- Draw
- Movement
- Rituals
- Runes
- Battle
- Resolution
Both players move through one shared turn, one phase at a time:
Draw → Movement → Rituals → Runes → Battle → Resolution
In each phase the first player takes all of their actions for that phase, then the second player takes theirs. You finish a phase before anyone starts the next one. Each phase happens once per turn, however many players act in it. So a card that lasts "for the next 2 movement phases" lasts for the next two turns.
| Phase | What happens | Who |
|---|---|---|
| 1. Draw | Draw 1 card | Both |
| 2. Movement | Place a shield, swap a pair, use movement abilities | First player, then second |
| 3. Rituals | Play up to 1 Element and 1 Ritual | First player, then second |
| 4. Runes | Roll the d8; activated runes take effect | Second player rolls |
| 5. Battle | Score, compare, deal damage | Both at once |
| 6. Resolution | End-of-battle effects; set next turn's first player | Both |
5.1 Draw
Each player draws 1 card from either their Shield Deck or their Ritual Deck.
- If one deck is empty, you must draw from the other.
- If both are empty, you draw nothing and play goes on.
- Running out of cards never costs you anything else. There is no reshuffle: nothing returns to a deck from Valhalla.
5.2 Movement
In the Movement phase you may do any or all of the following.
Place one shield from your hand. You choose a column, and the shield drops into the frontmost open slot of that column. While any of your columns is empty, you must choose an empty one, so Row 1 always fills first. Once all three columns hold a shield you may choose freely: a column holding one shield puts the new one in Row 2, a column holding two puts it in Row 3. One placement per Movement phase.
Make one free swap. Exchange two of your own shields that are adjacent (up, down, left or right), or move one shield into an adjacent empty slot. It costs nothing and works whatever enhancements the shields carry. One swap per Movement phase, and a step into an empty slot counts as it. Shields still slide forward to fill gaps afterwards, so a step backwards changes nothing: in practice the step into an empty slot is a sideways one. A shield you placed from hand this turn can't be part of it: coming in from your hand was that shield's move for the turn. You can still make your swap using other shields.
Use Raven.
Each shield with the  Raven enhancement may, once per turn, move anywhere on your own
battlefield: swap with any of your shields, at any distance, or move into any open slot. If it
moves into a slot with an empty slot in front of it, it slides forward as usual. Raven never
reaches the opponent's side.
Use any movement a card grants. Some Jarl abilities and rituals let shields move. A grant like that applies to each qualifying shield separately, and each one may choose whether to move.
What can't move:
- A Row 1 shield facing an enemy Ice shield cannot move or swap by any means: not the free swap, not Raven, not a card. Ice pins only the one shield directly across from it.
- A shield a card says can't move (Caged Bird) takes no moves of its own, and no other shield can swap with it. It still slides forward to fill a gap, because the board closing up isn't a move.
- A troll never moves, and nothing moves it (see Trolls).
A shield placed this turn is not frozen. Only the free swap is off-limits to it. Raven, rituals, Jarl abilities and runes (yours or the opponent's) can all still move it, and it slides forward like any other shield.
Getting a specific shield to a specific spot is slow. The free swap moves it one slot a turn, so where you place a shield matters. Raven and movement rituals are the fast way.
5.3 Rituals
You may play one Element card and one Ritual card. These are two separate allowances. You may play both, either, or neither, and using one doesn't touch the other.
- Cards can raise an allowance. The Seer's Word, for example, can let you play 2 Rituals next turn. That raises only the Ritual allowance, not the Element one.
- An Element card goes onto your Jarl (see Jarls and Elements).
- A Ritual card takes effect, then goes to your Ritual Discard. Attachment rituals instead stay on the shield they attach to.
- Because the first player plays first, the second player sees the first player's cards before choosing their own.
The rest of what you need to know about playing rituals is in Playing rituals.
5.4 Runes
The second player rolls one d8. The result is shared: it activates every shield on both battlefields that bears that rune.
- Each player decides for their own shields whether to use an activated rune. Every rune can be declined. Some runes can't do anything because of where the shields stand (Courage needs a Row 2 bearer, for example), and that is fine.
- Luck: if the d8 shows the same rune as last turn, the result is Luck instead. The repeated rune does nothing this turn.
What each rune does is in the rune table. Energy, Grace and Healing happen now, on the board. Courage, Love, Peace, Strength, Protection and Luck all take effect during the Battle.
5.5 Battle
The heart of the game. See Battle.
5.6 Resolution
- Effects that wait for the battle's result happen now (A Die for a Life, Tap on the Head, Chance of Flailure, and the like).
- If a Jarl is at 0 Defense, or a player has lost their last shield, the game is over.
- Next turn's first player is the winner of this turn's battle. On a tie, the player who went first this turn goes first again.
6. Battle
There is no attacker and no defender in advance. Both players add up their side, the totals are compared, and the difference decides who deals damage and how much.
6.1 Scoring
Each player works through this list, numbered the way the playmat numbers it.
| # | Category | Counted from |
|---|---|---|
| 1 | Base attack | The printed attack of your Row 1 shields |
| 2 | Jarl bonus | Your Jarl's unlocked abilities |
| 3 | Ritual bonus | Your rituals this turn |
| 4 | Enhancement attack | +2 for each Daggers in Row 1, Sword in Row 2 and Arrows in Row 3 |
| 5 | Attack gem alignment | Row 1 |
| 6 | Defense gem alignment | Row 1. This one is damage resistance, not attack. Work it out now and mark it on your shields, but it is not compared. It is used in the damage step |
| 7 | Sub-element alignment | Row 1 |
| 8 | Base element alignment | Row 1 |
| 9 | Battle dice | Roll one d6 per Row 1 shield, plus any extra dice; add them up |
| 10 | Rune bonus | Courage, when it's rolled |
So there are ten items, and nine of them are compared. Item 6 never counts as attack.
Alignment bonuses (Row 1 only)
| Shields in Row 1 that share… | A pair | Three of a kind |
|---|---|---|
| Attack gems | +2 attack | +4 attack |
| Defense gems | +2 damage resistance on each of those shields | +4 damage resistance on each of those shields |
| Sub-elements | +1 attack per pair | +2 attack per group of three or more |
| Base elements | +4 attack | +8 attack |
For sub-elements, pool every sub-element icon on your three Row 1 shields and count the groups. Each shield counts one base element for alignment, even if a card has given it a second one.
Bonuses go on your total, never on a shield. Jarl bonuses, ritual cards that "add to your total attack", and the Courage rune are worked out from your shields, wherever they stand, but the value is added to your total. No shield's attack changes. Two things follow:
- A card that checks a shield's attack ("attack of 7 or less") never sees these bonuses.
- Nothing that doubles a shield doubles these bonuses.
6.2 The dice
The battle dice are rolled last, once everything else is known. In order:
- Each player rolls one d6 per Row 1 shield, plus any extra dice (from Strength, or from cards that add a die). A player with an empty Row 1 rolls no dice.
- Any card that re-rolls the battle (Ulfhednar) is decided, and the new dice replace the old ones entirely. A re-roll can't trigger the same card again: the battle is rolled at most twice.
- Luck: each player may re-roll one of their own dice for each of their shields bearing Luck, on whichever roll now stands.
- Add up your dice. "Double your attack die" doubles that sum, not the number of dice.
6.3 Finding the winner: N
The two playmats share one slider: a single track from +26 on one side, through 0 in the middle, to +26 on the other, with one pawn that starts each turn at 0. Take the nine compared categories one at a time and move the pawn toward whoever won each one, by the amount they won it by.
Where the pawn ends is N, the margin of victory, on the winner's side.
Shortcut: N is simply one player's total minus the other's. The slider is the same subtraction, done category by category. If N goes past 26 the pawn just runs out of track. N itself has no limit.
A tie means no damage, and no one wins the battle.
6.4 Dealing the damage
Once N is known:
- The winner names one enemy Row 1 shield as the target.
- Protection: if Protection was rolled and the loser has shields bearing it, the loser may now move the hit onto one of their Protection shields, in any row, or let the named target stand.
- Subtract damage resistance (DR). The target's DR is everything that applies to it: its defense-gem alignment, Jarl DR, ritual DR and the Love rune. Net damage = N − DR, never below 0.
- Apply it. Net damage comes off the target's current Defense.
- If net damage is equal to or more than the target's current Defense, the shield is destroyed, and anything left over hits the enemy Jarl.
- The board closes up (see No gaps, ever).
- A shield destroyed in battle is replaced by a draw. Its owner draws 1 card from their Shield Deck into their hand. If that deck is empty, nothing is drawn.
Example. You win the battle by N = 14. You target a Row 1 shield with 9 Defense left and 2 DR. Net damage is 14 − 2 = 12. That is at least 9, so the shield is destroyed, and the leftover 12 − 9 = 3 hits the enemy Jarl. Its owner draws a shield.
Exactly enough counts. 12 net damage into a shield with 12 Defense left destroys it, with nothing left over for the Jarl.
Battle damage destroys at most one shield. Everything past it goes to the Jarl.
7. Damage and healing
Damage stays. A shield keeps its damage from turn to turn until it is healed or leaves the battlefield. A shield is damaged whenever its current Defense is below its printed Defense.
Damage resistance (DR) only reduces damage. It never adds to Defense.
- Most DR is tied to Row 1. Defense gems, every Jarl DR ability and the Love rune all name Row 1, so a shield doesn't keep that DR when it moves back.
- DR a card gives a shield without naming a row (Frigg's Intuition, for example) protects that shield wherever the battle damage lands, including a back-row Protection shield.
- A ritual's DR is active from the moment the card is played. It doesn't wait for the shield to be hit.
Card damage is damage. When a card deals damage, DR applies, a shield taken to 0 is destroyed, and the excess goes to the Jarl, exactly as in battle. The exception is a card that says "(Ignore DmgRes)", which skips DR entirely. Gelatinous Die's roll skips DR too, even though its card doesn't say so yet. A shield destroyed by a card does not give its owner a replacement draw. That draw is for battle damage only.
Damage caps (Brisingamen: "can only receive 3 damage per turn") apply after DR. For example, 10 damage into 2 DR leaves 8, the cap lets 3 through, and the other 5 are negated. Brisingamen's 3 is for the whole turn, not for each hit.
Healing restores; it never boosts. A heal can bring a shield or a Jarl back up to its printed Defense and no further. Anything extra is lost.
Leaving the battlefield wipes the slate. A shield that leaves the battlefield, for any reason, loses all its damage and any rituals attached to it. If it comes back, it comes back at printed Defense.
A card that replaces a shield's Defense keeps the damage. For example, a 7-Defense shield with 3 damage on it becomes a 20-Defense shield with 3 damage on it, so its current Defense is 17.
8. Jarls and Elements

| Attached | Unlocks | Liza adds |
|---|---|---|
 | Ability 1 | +1 |
| Abilities 1–2 | +1 +3 |
| All three | +1 +3 +5 |
Your Jarl starts at 40 Defense. It has three abilities, unlocked by attaching Element cards to it during the Rituals phase.
- 1 Element card of an element unlocks ability 1 for that element, 2 unlock abilities 1–2, and 3 unlock all three. At most 3 cards of one element count.
- Abilities stack. A shield qualifying for all three gets all three.
- An ability only helps shields whose Base Element matches. A shield whose Base Element you hold N Element cards of is said to have "N activated base elements". Sub-elements never count.
- You can climb several elements at once. With 2 Blood and 1 Sky attached, your Blood shields qualify for abilities 1–2 and your Sky shields for ability 1.
- It's the shield's current Base Element that counts. If a card changes a shield's element (the Shield Maidens do this), the Jarl sees the new one straight away.
Example. Liza Bladewind gives +1, +3 and +5 to your total attack for each Row 1 shield with 1, 2 and 3 activated base elements. With three of one Element attached, each matching Row 1 shield adds +1 +3 +5 = +9 to your total.
Elements are slow on purpose. They're shuffled into your Ritual Deck, so you can't dig for one. You can attach only one per turn, so the third ability is three turns away at best, however many copies you run. Every Element in your deck is a Ritual you didn't bring.
9. Playing rituals
Can I play it?
- If a card says "if …" and that isn't true right now, you can't play it. It stays in your hand and your allowance isn't spent.
- Predictions are different. A card that asks you to predict the dice is spent whether you guess right or not. If the two sides tie, a prediction of "higher" or "lower" simply fails.
- If a card's effect finds nothing to act on (nothing to destroy, a short deck), the card is still played and spent. It does what it can and nothing more happens instead.
What happens when I play it
- The card leaves your hand the moment you play it. A card that says "discard your hand" can't discard itself.
- Its effect happens.
- It goes to your Ritual Discard, unless it is an attachment, which stays on its shield.
Timing
- A card checks its condition once, when you play it, and the answer never changes. For example, if Carved Teeth goes on an 8-attack shield, a later buff that takes the shield to 10 doesn't undo it.
- A change to a shield happens immediately, and every card played after it sees it, on either side. Halve an enemy 9-attack shield to 5 and a "7 or less" card played afterwards can pick it. Played before, the same card sees 9. The order cards are played in matters.
- A card played now that acts later picks its target when it acts. If anything moved in between, it sees the new board.
- How long an effect lasts is whatever the card says. Most say "this turn".
- An attachment that acts "each turn, during" a phase acts as soon as it attaches, then once on each later turn as that phase opens, before anyone acts in it. Nobody chooses the moment. Jörmungandr the Destroyer rolls the turn you play it.
Using part of an effect (provisional)
When a card asks you to pick shields to move, heal or destroy, or cards to keep, return or discard, the printed number is the most you may use. You may use fewer, or none. The card is still spent. This default is still being confirmed card by card. See Still being settled.
Attachments
- A shield can carry one attached ritual at a time, whoever attached it. If your opponent attached one to your shield, you can't add your own.
- An attachment is lost when its shield leaves the battlefield, or when the shield breaks a condition the attachment's own text names. For example, Carved Teeth is lost if its shield leaves Row 1. If the card names no condition, the attachment follows its shield anywhere.
- A lost attachment goes to the Ritual Discard of the player who played it.
Trolls
Heart Troll (Thegn) and Stone Troll (Drang) put a 30-attack troll on the battlefield.
- Playing one. Pick a Row 1 shield on either battlefield. It is destroyed (to its owner's Valhalla, with no replacement draw) and the troll takes its slot. The troll uses your Ritual allowance like any ritual.
- The troll belongs to whoever's side it is on. That player controls it and pays its upkeep. Put it on your opponent's side and you give them the attack and the bill.
- Upkeep, at the end of every turn, starting the turn it's played. The controller may discard one matching Element card from their Jarl (Heart for Heart Troll, Stone for Stone Troll) to keep it. If they can't, or choose not to, the troll goes to the Ritual Discard of the player who played it, and the board closes up. Paying costs no card play.
- Upkeep comes first. It is paid before end-of-turn Jarl abilities, which then see one Element fewer. If two trolls on one side both go unpaid, they leave together.
- In battle a troll counts 30 base attack and rolls a battle die, like any Row 1 shield. It has a Base Element and nothing else: no gems, no sub-elements, no symbol. Any alignment it joins counts as a pair at most, never three of a kind.
- Nothing touches it. A troll can't be damaged, moved or targeted, and a troll isn't a "shield" in card text, so no card that says "shield" reaches it: not a destroy, a buff, a swap, Ragnarok or Ginnungagap. Battle damage can't pick it. A row swap skips its column. Only its upkeep removes it.
- It still fills a slot. A card that needs "less than 9 shields on the battlefield" counts the troll's slot.
- A troll alone is a lost game. A player with only a troll left has lost their last shield.
Where cards go
| Card | Goes to, when it leaves anywhere |
|---|---|
| Shield | Your Valhalla, unless a card names somewhere else |
| Ritual | Your Ritual Discard |
| Element card | Your Ritual Discard |
Each player has their own Valhalla and their own Ritual Discard. Several cards bring shields back from Valhalla. Nothing brings back a ritual. There is no hand limit.
When several effects change one number
If more than one effect changes the same shield's number, apply them in this order:
- The printed value.
- Changes to identity (element, enhancement).
- Effects that replace the value.
- Alignment bonuses.
- Effects that multiply or halve it.
- Effects that add or subtract.
- Caps and damage prevention.
Effects in the same step apply in the order they were played.
10. Reading card text
Card text is read plainly. If a card doesn't say it, it doesn't happen. These words always mean the same thing:
| On a card | Means |
|---|---|
| adjacent | Sharing an edge: left, right, in front, behind. Never diagonal. Same battlefield only |
| move | To an adjacent slot, unless the card names where |
| swap | Two shields trade places, at any distance, unless the card narrows it. Both shields are always on the same battlefield: a swap never crosses to the other side |
| swap row 1 with row 3 (or row 2) | The whole row moves, column by column, into empty slots too, and then the column slides forward. A column of two reverses; a lone shield ends where it started |
| in front of / behind | In a row nearer the front / further back, any column |
| all shields, each shield (no "your") | Both battlefields. "Your" or "your opponent's" narrows it |
| Valhalla (no "your") | Your Valhalla |
| damaged | Current Defense below printed Defense. A fully healed shield is not damaged |
| bears the element | Has it as its Base Element or as a sub-element |
| base element of X | The Base Element only |
| ritual card | Ritual cards only. Element cards don't count |
| last row | The deepest row that still has shields in it |
| battle die roll, higher / lower roll | The sum of that player's battle dice. A player with no dice rolled 0 |
| double your attack die | Double your dice total, not the number of dice |
| for the next N movement phases | The next N turns |
| (Ignore DmgRes) | Damage resistance does nothing against this damage |
| highest / lowest | Ranked on current values, after buffs |
11. Winning and losing
You win when either:
- the enemy Jarl reaches 0 Defense, or
- your opponent loses their last shield: every one of their shields is in Valhalla.
Shields in hand and in the Shield Deck haven't been lost. Running out of a deck is not a loss.
12. Card notes
Rulings on beta-deck cards that their printed text doesn't make obvious. Where your printed card disagrees, this list is right. Several card faces are due a reprint.
| Card | Ruling |
|---|---|
| A Die for a Life | Fires when your lowest battle die beats their highest battle die (each die on its own, not totals). "Last row" is their deepest row that still has shields. You choose which shield in it is destroyed. No replacement draw. Printed text "all 3 battle die higher" is out of date. |
| Berserker | If your shield is destroyed in battle, it never reaches Valhalla. It comes straight back to your last slot with doubled attack (for the rest of the game) and 1 Defense. You still get the battle-destruction draw. |
| Brisingamen | The 3-per-turn cap applies after damage resistance. |
| Caged Bird | The caged shield can't move itself, and no other shield can swap with it. It still slides forward to fill a gap. |
| Carved Teeth | May attach to either player's Row 1 shield. Its ×2 or ×4 is fixed when attached. |
| Druid in the Forest | It's already out of your hand, so you can't discard it to its own effect. |
| Draugr / Gatekeeper of the Bifrost | "Less than 9 shields on the battlefield" counts a troll's slot, so a troll and eight shields is nine. |
| Frigg's Intuition / The Seer's Word | Predictions compare dice sums. A tie means the prediction fails, and the card is still spent. |
| Ginnungagap | Removes, it doesn't destroy: nothing slides forward, and the new shields go straight into Row 1. It can't be played unless both players can draw 3 shields. Doesn't count as "destroyed" for Aesir's Grief or Cremation. A troll in Row 1 stays put: that player draws one shield for each shield removed, and needs only that many to draw. |
| Gelatinous Die | Its roll ignores damage resistance, though the card doesn't say so yet. |
| GoldenBoy's Bravado | No shield's attack changes. Your side attacks with your 3 highest printed base attacks from anywhere on your battlefield instead of Row 1's. |
| Ham Bear Pig / Yodin | The rows swap column by column, into empty slots too, then everything slides forward. A column holding a troll, a caged shield or a shield pinned by Ice is skipped. |
| It's a "Long" Boat / Njord's Serpent | No "your", so they reach both battlefields: Sea shields on both sides may move, and Row 1 on both sides is locked. Njord's Serpent's lock lasts the next 2 turns. |
| Meowlnir | Halves each enemy Row 1 shield separately, rounding each one up. |
| Jörmungandr the Destroyer | Rolls once as it attaches, then once each later turn when the Rituals phase opens. Nobody chooses when. |
| Now That's a Shield Wall | Score Row 2 on its own, as if it were Row 1, for the three attack alignments only (gems, sub-elements, base elements). Row 2 is read at Battle, and the bonus goes on your total. Blot Sacrifice doesn't double it. |
| Ragnarok | Once per game, by either player. Each player draws to replace their own shields, placed front to back in the order drawn. A short deck gives what it has. |
| Rooster Booster | +4 to your total for each qualifying shield, from any row. The shields' attack doesn't change. |
| Tap on the Head | Picks the highest-Defense enemy Row 1 shield when its effect happens, after the battle, not when played. |
| Ulfhednar | "Double your attack die" doubles your dice total. The re-roll happens at most once, and Luck applies afterwards, to the final roll. |
13. Quick reference
Runes
The second player rolls one d8 in the Runes phase. It activates every shield bearing that rune, on both sides. Each player may decline their own.
| d8 | Rune | Effect, for each of your shields bearing it | Where it works |
|---|---|---|---|
| 1 |  Courage | Add its base attack to your total attack this turn | Row 2 |
| 2 |  Energy | Swap it with any of your shields in a row in front of it | Any row |
| 3 |  Grace | Swap it with any of your shields in a row behind it | Any row |
| 4 |  Healing | Heal one adjacent shield by up to 6 | Any row |
| 5 |  Love | +6 damage resistance this turn | Row 1 |
| 6 |  Peace | The enemy shield directly across keeps only its printed Attack and Defense: no alignment bonuses (defense gems included) and no enhancement attack. It still rolls its die and still counts for Jarl and ritual bonuses | Row 1 |
| 7 |  Protection | After the winner names your Row 1 target, you may move the hit onto one of your Protection shields instead. The damage lands in full, and nothing carries on to a second Protection shield | Any row |
| 8 |  Strength | Roll one extra battle die | Row 1 |
| — |  Luck | Re-roll one of your battle dice. Happens instead of the rolled rune when the d8 repeats last turn's result | Any row |
Enhancements
| Enhancement | Effect | Where it works |
|---|---|---|
 Daggers | +2 attack | Row 1 |
 Sword | +2 attack | Row 2 |
 Arrows | +2 attack | Row 3 |
| Raven | Once per turn, move anywhere on your own battlefield: swap with any of your shields, or move into any open slot | Any row |
 Ice | The enemy shield directly across can't move or swap | Row 1 |
Damage at a glance
net damage = N − DR (never below 0), capped by any damage cap
destroyed  if net damage ≥ current Defense
to the Jarl = net damage − current Defense (if positive)
Glossary
- Jarl: your champion, 40 Defense. You lose when it reaches 0.
- Shield: a warrior card on your grid.
- Ritual: a spell or effect card from your Ritual Deck.
- Troll: a 30-attack body some rituals put in a Row 1 slot. Not a shield. See Trolls.
- Element card: attaches to your Jarl to unlock its abilities. It lives in the Ritual Deck, but it isn't a ritual card.
- Activated base element: a shield whose Base Element matches Element cards on your Jarl.
- Alignment: a bonus for Row 1 shields sharing gems, sub-elements or base elements.
- N: the margin by which a player wins the battle.
- DR: damage resistance, subtracted from damage before it lands.
- Valhalla: each player's pile of shields that have left play. Some cards bring shields back.
- Ritual Discard: each player's pile of spent rituals and Element cards. Nothing comes back.
- First player: acts first in each phase. The winner of the last battle.
14. Still being settled
The rules owner hasn't yet ruled on these. They're rare, and the game plays fine around them, but expect the answers to change.
- Using part of a card's effect. Using part of an effect above is the working default. Some cards may turn out to require their full effect.
- DR against card damage outside Row 1. If a card deals damage to a back-row shield (Chance of Flailure does), DR a card gave that shield is currently treated as applying, just as it does for battle damage.
- What each player can see. The working convention: your hand and your decks are hidden (the opponent can see how many cards of each kind you hold), and the battlefield is open. The rest hasn't been ruled yet.
Battle calculator
Enter each side's numbers and the calculator compares the nine categories from Scoring, the same way the slider does. Defense gems are shown but not compared: they become damage resistance.